Cabinet Refinishing San Jose CA is one way to refresh your kitchen without replacing all of the cabinetry. It involves sanding or chemically stripping the existing finish and applying new stain or paint.
However, not all cabinets are suitable for refinishing. For example, cabinets made with solid color medium-density fiberboard (MDF) aren’t good candidates for staining because they can’t be refinished to look like wood.
Cabinets are a key component of any kitchen, and it’s common to want to change up their look. Refinishing or refacing your cabinets can be an affordable option to get the update you desire without breaking the bank. Before you decide on which route to take, consider what you want your cabinets to look like and how they function in your space. This will help you determine whether refinishing or refacing is the best choice for you.
Refinishing involves the process of painting or staining existing cabinetry. The cost of refinishing your cabinets depends on the size of your kitchen and the amount of work needed to refresh the style. If you’re looking to add a custom touch, such as glazing or distressing, the price will increase.
To prepare for refinishing, you’ll need to remove everything from your cabinets and place it in boxes labeled by cabinet. This will keep your home clean and safe while the project is underway. You’ll also need a dedicated workspace like a garage or shed to work in. Make sure to use a tarp and cover your floor to prevent any accidental spills or paint splatters.
Before you start painting, it’s important to sand the surface of each cabinet to ensure a smooth finish and prepare for the new coats of paint. It’s best to have a professional do this to ensure quality results and protect your investment. A professional will also be able to touch up any spots that have chipped or cracked over time, which is a good way to keep your cabinets in top shape.
Once the cabinet doors are sanded, they can be primed and painted with three to five coats of white or natural-colored paint. This can be a messy job, so you’ll want to find an experienced contractor to handle the cleanup. Then, once the new coats of paint are dry, you’ll need to reinstall the cabinet hardware and doors.
While refinishing is less expensive than refacing, it’s still an extensive and labor-intensive project. It can take weeks to complete and will require you to live without a functioning kitchen while the work is being done. However, the results are worth the effort.
Time
Cabinet refinishing requires a significant time commitment. This is not a project to take on if you have other responsibilities that require your attention. It’s important to find a contractor that is patient and pays close attention to detail. This will ensure that the job is done correctly and does not have any long-term problems down the road. An inexperienced or impatient contractor may miss small details that will cause the refinish to fail sooner rather than later.
The cabinet refinishing process involves working with the existing cabinets and changing the color of them. This can be achieved either by chemically stripping the current finish or sanding the existing wood to prepare it for staining. The cabinets can then be stained in a different color. Light to dark stains are easier than light to light or dark to lighter finishes, but the number of doors and the amount of detailed work on them will make a difference in the overall time required.
When refinishing your cabinets, you will need to allow the wood time to dry completely before reattaching the doors and drawers. This will avoid any dents or scratches that can occur when the hardware is removed and reattached. It is also important to use a pre-stain wood conditioner before staining the cabinets, as this will help to prevent the stain from seeping into the wood and creating an uneven appearance.
One of the main advantages of refinishing your cabinets is that it is less expensive than replacing them with new ones. It is also a green option, as it reduces the waste generated by disposing of the old cabinets and materials. Another benefit is that refinishing your cabinets will prolong the life of the existing material, preventing further damage from the elements and normal wear.
However, it’s important to remember that refinishing isn’t an option for every home. If you have cabinets made from thermofoil or laminate, for example, they can’t be refinished. In addition, refinishing isn’t an effective option for cabinet boxes or interior panels, which will need to be replaced with new ones if you decide to reface your cabinets.
Preparation
Cabinet refinishing involves keeping the existing cabinet components and changing their appearance by sanding or chemically stripping the old finish and then staining or painting. It’s a labor-intensive process and it only fixes cosmetic issues such as scratches, dents and faded colors. It doesn’t address structural or functional issues and it can be difficult to do on doors with a lot of detail. It’s also not an option for cabinets that are made from thermofoil or laminate since these materials don’t hold paint well.
Prepping for cabinet refinishing starts with cleaning the surfaces. Wipe down the cabinet boxes, drawers and doors with a damp cloth or rag to remove dirt, grease and food residue. You can also use a mild degreaser like TSP (trisodium phosphate) and water to help break down grease and grime.
Once the surface is clean, scuff sand the cabinetry to create a profile that will better allow for primer and paint adhesion. This is especially important on kitchen cabinetry where oil from hands and steam and grease from cooking can really show up if the surfaces don’t have a good tack to them. After sanding, vacuum and tack the surfaces to remove any residual dust that may have settled there.
Choosing the right primer is another important step in the prep process. Using the wrong primer could lead to chipping, uneven surface and color bleeding. A good primer should promote adhesion, be easy to work with and should block stains. A high-quality acrylic latex primer such as KILZ 3 Premium Primer is an excellent choice. It’s easy to work with, dries quickly and blocks stains.
When preparing for refinishing, make sure to mask off the areas that you don’t want painted. You can use paper, plastic or tape to protect them from paint splatter. Masking is particularly important when you’re going from a light color to a dark one or vice versa.
Once the cabinet surfaces are ready for priming, apply two coats of primer. Wait 4-6 hours in between each coat to let it dry properly. Once the primer is completely dry, you can move on to painting your cabinets. It’s best to use a mini roller for this step, as it will leave less brush marks and help you achieve a smooth finish.
Results
A refinish job can transform dull or outdated cabinetry into a stunning display that will wow guests and family members. The process involves sanding and staining the cabinet doors and drawer fronts to give them a fresh, updated look that will last. Cabinet refinishing is a cost-effective way to update your kitchen without having to replace the cabinets. Before you consider refinishing your cabinets, it is important to determine if they are still working for you and to visualize how you want them to look.
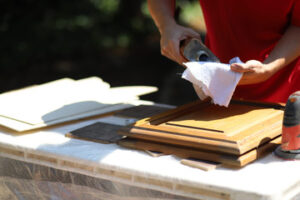
It is necessary to take the cabinet doors off of their hinges in order to refinish them. Taking them off will prevent them from accidentally incurring any damage to other parts of your cabinetry and will also ensure that the finishing liquids don’t drip down and taint the countertops or floors. Once the cabinet doors are off of their hinges, they will be sanded lightly to smooth the surfaces and then cleaned thoroughly to remove any dirt particles that may have built up. Then, they will be sprayed with a bonding primer, and once that is dry, the stain can be applied.
Once the stain has been applied, it will need to be sanded again in order to level the grain and eliminate any rough areas that might cause the wood to become damaged or worn over time. Then, the cabinets will be wiped down with micro-fiber and then coated with two coats of lacquer to protect them from wear and tear and create a beautiful finish.
The resulting finish is beautiful, durable, and will withstand heavy use and cleaning for years to come. It is far more long-lasting than paint and exceeds the KCMA (Kitchen Cabinet Manufacturer’s Association) standards for finishes.